

Building a Motion Capture Suit Using DIY Techniques
Introduction
About a decade ago, I built a Motion Capture Suit using a self-devised method I called the Inverse Projection process. The goal was to capture 3D body movement using minimal equipment while maintaining usable accuracy. Unlike expensive commercial systems, my solution relied on accessible tools, some clever syncing techniques, and professional software to trace motion in 3D space.
DIY Construction of the Motion Capture Suit
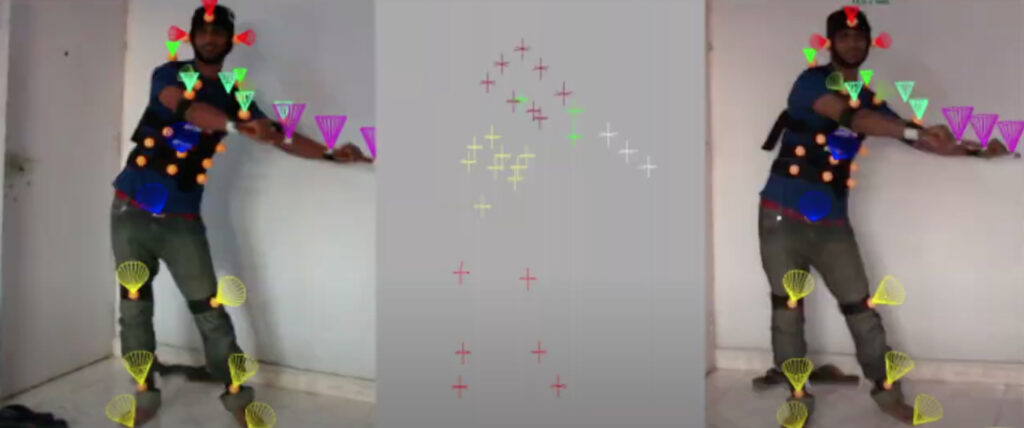
To track body joints effectively, I created a Motion Capture Suit using Velcro straps and ping pong balls. The ping pong balls acted as simple, highly visible motion markers and were attached to key joint locations such as the shoulders, elbows, knees, and hips. The Velcro made it easy to adjust and reattach the markers as needed. This cost-effective setup mimicked professional marker-based MoCap suits but was built entirely from everyday materials.
Camera Setup for Recording Motion
The recording setup included two video cameras:
Camera A (Tripod): Provided a fixed viewpoint for stability and consistent reference.
Camera B (Handheld): Offered a dynamic perspective, enabling depth analysis through visual disparity.
Both cameras were used to film a subject wearing the Motion Capture Suit while performing movements in a controlled environment.
The Importance of Synchronization
In the first trial, I transferred the footage from both cameras to a computer and attempted to extract motion data. However, the reconstruction failed due to a lack of frame-by-frame synchronization between the two video streams. Without synchronized frames, 3D triangulation was inaccurate.
To resolve this, I manually aligned the footage based on visual cues. Later, in the second trial, I introduced a hand clap at the beginning of the session, creating a clear visual and audio marker for precise synchronization. This simple solution—borrowed from film production—was highly effective.

3D Motion Tracking Using PFTrack
Once the videos were synchronized, I used PFTrack, a professional 3D tracking and matchmoving software, to process the footage. PFTrack allowed me to:
Import both camera views
Track the motion of the markers
Reconstruct the camera paths and 3D positions of the markers over time
This was a critical step in accurately mapping the movement captured by the Motion Capture Suit into 3D space using the Inverse Projection concept.
Motion Capture Suit : Key Learnings and Takeaways
This project taught me several valuable lessons:
Synchronization is essential for multi-camera motion tracking.
Simple materials like ping pong balls and Velcro can be surprisingly effective in building a Motion Capture Suit.
Software like PFTrack can bridge the gap between DIY setups and professional-level 3D motion analysis.
Conclusion
By combining basic hardware, thoughtful design, and industry-standard software, I was able to develop a functioning Motion Capture Suit without relying on expensive commercial solutions. This project demonstrated that with the right tools, techniques, and creativity, advanced motion tracking can be achieved in a cost-effective and hands-on way.
At the end, the use of the Motion Capture Suit proved not only effective for my DIY setup but also highlighted how integral motion capture is within the broader field of VISUAL EFFECTS (VFX). By accurately capturing real human movement and translating it into digital form, motion capture enhances the realism and fluidity of animated characters and scenes. In modern VFX pipelines, it’s a critical tool used to bridge live-action and CGI elements seamlessly. This project helped me appreciate how even a home-built MoCap system, when combined with the right tracking software, can contribute meaningfully to processes typically reserved for large studios.